HOW TO SEW A PERFECT ¼-INCH SEAM EVERY TIME
Accurate seam allowances for quilting are non-negotiable. Quilting patterns are drafted to an exact ¼-inch, and when your seam allowance drifts, even by a thread, it compounds. One seam that's 1/32" too wide is barely noticeable. Across twelve seams in a single block, it is.
A Perfect ¼-Inch Seam
I've been quilting for over twenty years, and I've seen how inaccurate ¼-inch seams can make your work look distorted. In this post I'll share the prep I do before every project, the tools I reach for, and the habits that keep my seams accurate from the first stitch to the last.
The Foundational Measurement Of Quilting, The ¼-Inch Seam
Quilters know that an ¼-inch seam is the essential measurement of quilting. In this blog I’ll share with you a two-minute prep to sew an accurate ¼-inch seam without fail. All you’ll need is a special ruler and a magnetic seam guide
Tools
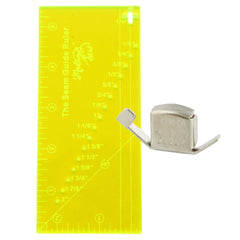
The tools I used for my two-minute prep to sew an accurate ¼-inch seam is the Seam Guide Ruler and Magnetic Seam Guide set.
Fabrics
You’ll need two fabric that are a minimum 4-inches square. This is a great opportunity to use fabric scraps from previous projects.
Why Invest The Time In A ¼-inch Seam Prep
By listening to the sound of my sewing machine’s motor, I can determine if ‘she’ needs attention. Before I start a quilting project, she’ll get cleaning and lubrication. I’ll give her a test run by sewing on a scrap of fabric. Then, I’ll check that ¼-inch seam measurement. I like the prep. I have found that the time I invest in it results in my best work. But, if you’re not convinced it’s worth your time, let’s take a quick look at the problems you can avoid.
Avoiding Problems With Inaccurate ¼-inch Seams
Inaccurate seams can happen to even the most experienced among us. Skillfully positioning the fabric under the needle while piecing won’t result in consistent ¼-inch seams, if you forgot you moved the needle position! Ask me how I know this.
An Inaccurate ¼-inch Seam
We know that inaccurate seams will add up to trouble. Your pieced work will be too large or too small. Quilts really are intricate puzzles that depend on math to produce blocks of very specific shapes and sizes. If the seam math is is not accurate it will multiplied in every block that is made. For a quilt that has hundreds of blocks the inaccurate sizes will be noticeable to the naked eye. Of course, you can ‘fix it’ by adding hundreds of small pieces of sashing to accurately size up the block or you can trim the edges of hundreds of pieced blocks to trim each block to the accurate size. Sometimes ripping out the seams and starting again is the solution. My point is accurate ¼-inch seams are extremely important in quilting.
Seams That Are Too Large, Accurate And Too Small
But that’s doing things the hard way. Why not avoid the stress, wasted time and the fixes with a two-minute prep?
I’ll show you how to use a seam guide ruler and magnetic seam guide to quickly calibrate your needle position and align your fabric to get a ¼-inch seam every time.
Seam Guide Ruler and Magnetic Seam Guide
Your ¼-inch Presser Foot Is Best Used For Accurately Sewing Straight Seams
My two-minute prep works with every presser foot. But, you might be thinking, I don’t need to test my ¼-inch seam because I use a ¼-inch presser foot and it has its own seam guide. I agree with you, your ¼-inch presser foot is exactly what you will need for sewing blocks together with straight quilting seams. After all, the 1/4-inch presser foot was created for quilters! Check out this blog post for a deeper dive into the quarter inch presser foot. This foot is especially useful when chain piecing straight seams for a large numbers of blocks. Simply align the fabric with the far right edge of the ¼-inch presser foot and you’ll make quick work of piecing a multitude of blocks with an accurate ¼-inch seam. My personal favorite is the ¼-inch presser foot with the seam guide. It is particularly great at keeping long, straight fabric strips aligned. I never worry about the seam accuracy when I sub-cut long fabric strips because I know each sub-cut will have an accurate ¼-inch seam. And it has non quilting applications too.
¼-inch presser foot on fabric with straight seam
Use My ¼-Inch Seam Prep Method For Accurate Sewing
The ¼-inch presser foot won’t help you much when you’re sewing curved seams and need the better visibility. My favorite presser foot for curved seams is an Open Toe Presser Foot. My two-minute prep can easily calibrate the Open Two Presser Foot to produce a perfect ¼-inch seam.
Open Toe Foot On Fabric With Curved Seam
The ¼-inch seam prep takes only three easy steps. Put simply, it’s a calibration. Once you try it, you’ll never want to skip this prep.
Step One: Align the ruler with the presser foot
Raise the presser foot and needle. Place the seam guide ruler under the presser foot.
Slowly bring the presser foot down until it sits on top of the seam guide ruler.
Raise the presser foot high enough to manually align the far right edge of the seam guide ruler with the far right edge of the presser foot.
Far Right Edge of Ruler Aligned With Far Right Edge Of The Presser Foot
Step Two: Align the needle position with the seam guide’s ¼-inch hole
Locate the ¼-inch seam hole on the seam guide ruler. It should be the second hole from the right. Use the needle position controls on your sewing machine to position the needle above the ¼-inch hole in the ruler.
Then use the hand wheel of your sewing machine to slowly lower the needle into the ¼-inch hole. It should smoothly enter the hole.
Close-Up Of The Needle In The ¼-inch Hole Of The Seam Guide Ruler
Step Three: Align The Magnetic Seam Guide With the Seam Guide
Ruler
Align the magnetic seam guide with the seam guide ruler by positioning it on the metal needle plate of your sewing machine. The magnetism in the seam guide is strong enough to hold its position on the needle plate but will not interfere with the inner workings of computerized sewing machines. And check out the magnetic seam guide in action in this pillow case tutorial. It helps you quickly set up your sewing machine for projects when several different seam guide measures are required.
Take a Bow
Well done! You have skillfully calibrated your sewing machine to execute an accurate ¼-inch seam in just two minutes.
Test it Out
Now let’s sew a perfect ¼-inch seam on a test strip of fabric. Simply remove the ruler and use scrap fabric to sew a ¼-inch seam. Place your fabric against the magnetic seam guide to align the fabric for perfect ¼-inch seams.
Magnetic Seam Guide Aligned With Seam Guide Ruler
Use the Seam Guide Ruler to check any ¼-inch seam’s accuracy in seconds
Now that you know how to do the full two-minute calibration, you can also use the seam guide ruler for a super quick ¼-inch measurement check.
The second line from the far right of the ruler is a ¼-inch seam line. Use it to check how straight your seams are. I’m not judging anyone; a distraction can easily cause a bump in a gorgeous straight seam. Use the seam guide ruler’s ¼-inch line to check the size of the bump. If it is long and wrong, then fix it. Otherwise, let that little bump be part of the charm of your work.
Checking The ¼-inch Measurement With the Seam Guide Ruler
Tip: This little ruler has a few other features that I like as a quilter. You can calibrate seams from ⅛-inch to 2-inches. It has a ‘+’ shaped ¼-inch pivot point opening that’s big enough for you to use a pencil or pen to mark pivot points on your fabric. It also has a 45-degree angle that’s handy for making half square triangles. And of course, it is a 5-½ inch ruler which is the perfect size for the press and cut mini workstation to the left of my sewing machine. Take it with you to sewing classes and keep it close when sewing at home. Actually, get two and put your initials on them. Then you’ll always have one when the other one inevitably ‘disappears’. Ask me how I know this!
Extra Tips to Get Accurate Quarter Inch Seams
Here are a few more tips on how I achieve more accuracy when quilting.
Tip 1: Accurately Miter Binding
When attaching binding to a quilt the ¼-inch pivot point opening of the Seam Guide Ruler makes it easier to mark the ¼-inch point from the corner edge of the quilt. I put a pin through the mark to remind myself to stop sewing and back stitch at the ¼-inch before shaping the mitered corner of the binding. The size of the ruler makes it easier to find than my metal gauge - which manages to hide from me just when I need it.
Tip 2: Accurately Mark Half Square Triangles
This ruler is also a natural aid for making half square triangles. For example, one of my favorite quilt blocks is the Card Trick Block. It is a nine patch block that requires a dozen 5.5-inch squares with center diagonal lines and diagonal ¼-inch stitching lines. I’ve used other tools to mark these lines like the quarter inch patchwork ruler set and the six-inch square ruler but a multifunctional tool makes it easier.
Tip 3: Improve Accuracy With A Press And Cut Workspace
Another important thing for accuracy is a good setup of your workspace. If you keep a press and cut workspace next to your sewing machine, then you already know the convenience of it. For those who don’t, just imagine that you won’t need to walk over to your ironing board each time you have to press a block or a seam. Moving around the fabric pieces, can cause inaccuracies more quickly. Pressing and trimming your blocks as you sew directly contributes to the accuracy of seams and the entire quilt. Don’t be tempted to skip it because your press and trim workspace is not nearby.
Tip 4: Improve Accuracy With Properly Pressed Seams
Knowing how to properly press seams in quilting is the magic behind best quilt blocks. This comprehensive tutorial about pressing seams in quilting gives you everything you need to know.
Tip 5: Test Your Sewing Machine Set-up For The Best Accuracy And To Achieve A Perfectly Balanced Stitch
Quilting is equal parts art and science. The science of quilting is a formula. The formula is the combination of the stitch length, the type of thread, the sewing machine thread tension, the sewing needle type, the fabric weight and the humidity in the sewing environment. It sounds like a lot but I guarantee you, investing the time to do a simple sewing test on a scarp piece of your quilt fabric will ensure the best accuracy and a balanced stitch. Troubleshoot any problems on the test fabric, not while you are sewing your quilt project. Your sewing machine manual is the best resource for troubleshoot common problems like these:
- Light weight cotton fabric bunches or puckers.
Apply the formula of the right combination of a shorter stitch length along with the right sewing machine needle. A shorter stitch length gives you more control while sewing. A fresh Universal sewing needle has a sharp point that is slightly rounded. This helps the needle to easily pierce most fabrics. - Medium weight cotton fabric has skipped stitches.
Apply the formula of the right type of needle, needle tension and stitch length. For medium weight cotton that is a 80/12 Universal needle, a standard thread tension of 4, a stitch length of 2.5 mm and a 80/12 Universal needle. - Thread Breaks And Humidity
Your sewing machine manual will have you run the troubleshooting checklist formula. Are there obstructions from lint or dust in the machine? Does the needle have burs and nicks? What’s the thread quality? Where there threading errors? If the thread is still breaking it could be the humidity in the sewing room. High humidity causes thread to swell from the extra moisture. This make it harder for the thread to pass through the tension disks of the sewing machine. While low humidity causes dry air which can make thread brittle.
I encourage you to set up a workspace and do it today. Only essential items are placed in this workspace area. Just seven items are needed to outfit it: an ironing mat, wool pressing mat, small iron, six-inch square ruler, spinning cutting mat, rotary cutter and the seam guide ruler. I use this workspace to quickly check the size of each block. Do this instead of sewing the wrong-sized blocks together. I check the finished size of blocks too. And I trim as I go. This catches any measurement errors early before they can become big trouble.
I'd love to see the projects you’ve made after using this prep to sew a perfect ¼-inch seam every time. Check out these handy rulers and measuring tools. Share your creations with the quilting community and inspire others to try this easy prep.
May your quilting always bring you joy!
Ernie Grant
Guest Blogger For Madam Sew
Ernestine “Ernie” Grant is an avid quilter with over 20 years of experience and is the owner of the custom baby quilt business kalibabyquilts.com