Make Fabric Gift Bags for the Holiday Season: A Creative Take on the Drawstring Bag
Looking for an eco-friendly alternative to wrapping paper? Fabric gift bags are reusable, durable, and add a thoughtful, handmade touch to any occasion. Whether for Christmas, birthdays, or special events, creating your own gift bags is quick, easy, and rewarding.
This guide will walk you through sewing fabric gift bags, share tips, and show you how to customize them for a personal touch. With these techniques of how to make a drawstring bag and how to make a boxed bag, you can create various types of gift bags to perfectly wrap every present this season. Even if you are new to sewing, these tutorials are for you, especially the boxed bag.
Looking for helpful sewing guides? Check out the Madam Sew beginner series for sewing.
Why Make Fabric Gift Bags?
- Eco-Friendly: Unlike disposable wrapping paper, fabric gift bags can be reused for years, reducing waste. Recipients can repurpose the bags for storing items like jewelry or travel essentials—or simply return them for reuse next year!
- Budget-Friendly: Use fabric scraps or inexpensive materials to make one-of-a-kind bags.
- Customizable: Match the fabric to the occasion with festive prints, florals, or elegant solids. Add personalization with heat transfer vinyl or other decorations.
Materials to Make a Gift Bag
To create simple or drawstring fabric gift bags, gather:
- Fabric: Cotton is ideal and easiest to work with, but any type of fabric can work. Choose prints or solids to suit your style.
- Thread: Match or contrast the fabric.
- Ribbon or Cord: For the drawstring casing and decorative ties.
-
Tools:
- Sewing machine
- Fabric scissors or rotary cutter
- Pins or clips
- Iron for pressing seams
- Pinking shears or a serger to finish seams
Various Gift Bag Designs
- Drawstring Bags: Close with a ribbon or cord for a classic look. (Check out our earlier tutorial on making quick and easy drawstring bags for a Pachamama charity project!)
- Simple Boxed Bags: Quick and easy—just gather the fabric with a ribbon. Optionally, sew the ribbon in place for convenience.
- Hybrid Bags: Combine drawstring and boxed bag techniques for added depth and a decorative ribbon accent.
Tutorial 1: Simple Boxed Gift Bag Step-by-Step
To make this gift bag you just need two pieces of fabric, a piece of ribbon and the common sewing tools like fabric shears, pins, a marker, a ruler, a sewing machine, thread, pinking shears and a hot iron.
Step 1: Cut Your Fabric
- Cut two pieces of fabric for the front and back panels. I cut my panels 17 by 14 inches.
-
This is how you can calculate the dimensions for your bag:
- Length: Desired bag height + half the bag’s depth + seam allowances (½" for the bottom seam + seam allowance for the top finishing)
- Width: Desired bag width + the full depth of the bag + seam allowances (½" per side).
Step 2: Sew a Flat Bag
- Align the two fabric pieces, right sides together, and pin them.
- Sew the sides and bottom of the fabric pieces with a ½" seam allowance. Leave the top open.
- Finish all raw edges with pinking shears, a serger, or a zigzag stitch.
- You now have a simple bag.
Step 3: Box the Corners
- Keep the bag wrong side out and flatten each corner into a triangle with the side seam and the bottom seam on top of each other.
- Mark a line with a fabric marker at a 90° angle to the seam to create the desired depth. The higher you position your ruler, the deeper your bag will be.
- Sew along the marked line, then trim the excess fabric ½" away from the stitch.
- Finish the raw edge with pinking shears, a serger or a zigzag stitch.
Step 4: Finishing Touches
- Press the seams and turn the bag right side out.
- Finish the top edge with pinking shears, or hem with a single fold, or a double-fold hem.
- Find the center of a piece of ribbon for the closure. Pin it to one side seam, about 2" below the top edge, and stitch it in place in the seam.
Your bag is ready! Simply tie the ribbon around the gathered fabric to close.
Tutorial 2: Drawstring Gift Bag with Ribbon Casing Step-by-Step
For this gift bag you need two pieces of fabric, a piece of ribbon for the casing and two pieces or cord or ribbon (slimmer than the casing ribbon) for the drawstring itself. And again, just your regular sewing tools like fabric shears, pins, a marker, a ruler, a sewing machine, thread, pinking shears, a safety clip and a hot iron.
Step 1: Cut Your Fabric
-
For a medium-sized bag, cut two pieces of fabric measuring 15" x 11". Adapt the size of the two panels for other sizes of gift bags. You can calculate the same way as I explained for the boxed bag.
- Length: Desired bag height + half the bag’s depth + seam allowances (½" for the bottom seam + seam allowance for the top hem)
- Width: Desired bag width + the full depth of the bag + seam allowances (½" per side).
Step 2: Hem the Top Edges
- Fold, press and pin the top edges with a single or double hem.
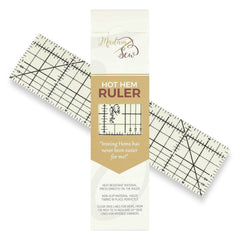
TIP: A hot hem ruler is a neat tool to use to hem faster without losing accuracy. You can iron on this ruler skipping steps like marking and pinning.
- Then stitch the hem in place. Do this before assembling the bag (i.e. sewing the side seams).
Step 3: Add Ribbon Casing
- Cut two wide ribbon pieces. The length corresponds with the width of the fabric. Fold in the four raw edges of the ribbon and pin the ribbons parallel to the top hems on the right side of the fabric, ensuring they’re at least ⅜" from the side edges.
- Topstitch the ribbon along both long edges of each ribbon to create casings.
Step 4: Assemble the Bag
- Align the fabric pieces, right sides together, and pin the sides and bottom.
- Finish the edges of these seams with pinking shears, a serger or an overcast stitch. If you need more help with finishing edges, read our blog post about using your home sewing machine as a serger.
Step 5: Box the Corners
- Flatten and measure a 3" line across each corner to create a 3" deep bag. Draw a line. Sew along that line and trim the excess fabric about ½ inch from the sewn line. For more details, check Tutorial 1, Step 3 above.
Step 6: Insert the Drawstrings
- Cut two cords or ribbons slightly longer than the bag’s circumference.
- Thread one cord through both casings, starting and ending on the same side of the bag. Repeat with the second cord, starting on the opposite side of the bag.
- Knot the ends of each cord, and your bag is ready to cinch closed
This is the finished drawstring gift bag! The last image is showing another version of the same bag, a little smaller, the ribbon casing is wider. You can be creative and change different aspects of the bag according to your own needs and preferences.
Tips for Perfect Fabric Gift Bags
- Use Stiffer Fabric: If you use laminated fabric, for example, the bag can stand up like a paper or cardboard bag.
- Lining: Add lining and get an even more polished look, using matching fabric. Make two identical bags, one without a casing and sew the top edge together on the wrong side. Don’t forget to leave a turning hole in the bottom seam of the lining bag.
- Press Your Seams: Ironing during all steps creates crisp lines and professional results.
Creative Uses for Fabric Gift Bags
- Holiday Wrapping: Perfect for Christmas, Hanukkah, or festive occasions.
- Party Favors: Fill with candy, small toys, or keepsakes.
Final Thoughts
Fabric gift bags are a simple, sustainable way to wrap presents. They’re reusable, customizable, and add a personal, handmade touch to any occasion. Plus, sewing them is a fun project that allows you to get creative with fabrics and designs. Experiment with sizes, fabrics, and closures to create a personalized touch for every gift.
You can also make easy zippered bags to hold a gift or make a big tote bag. This Halloween goodie bag tutorial can also serve as a gift bag for various occasions.
Ready to start sewing? Gather your materials, follow our step-by-step guides, and make gift-giving even more special with your very own fabric gift bags!
Happy sewing!
An
Blogging for MadamSew.com